Step by Step
Lotus Flower Drawing Lesson

For this lotus flower drawing you'll start with the middle of the flower and work your way outward. It is usually easier to approach your drawing by starting from the middle for circular shaped flowers like this because you will be following the natural design of the plant.
You can use the colored example at the top of this page to see what the finished drawing should look like, but you should also be aware that by doing the steps in order you are learning a formula for how to draw flowers that you can apply to almost any flower reference picture that you can find.
Step 1- The Pistil
 The middle of the flower where the seeds grow is called the pistil. This part of the lotus is similar to a cylinder geometric shape. Start by drawing an oval and then draw two curved lines coming down from each side of the oval. The middle of the flower where the seeds grow is called the pistil. This part of the lotus is similar to a cylinder geometric shape. Start by drawing an oval and then draw two curved lines coming down from each side of the oval.
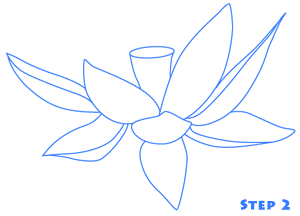 Step 2 - The Flower Petals Step 2 - The Flower Petals
The lotus flower drawing might be a little easier if you draw the petals in two separate steps. Try to think of the petals as front petals and back petals. The front petals appear in front of the pistil that you drew in the first step. Look at the example image at the top of the page and focus on the lines that define the outer edges of the petals. Keep in mind that the petals aren't totally flat - they're slightly rounded and that's why the petals on the left and right sides of the image for this step have an extra line added to them to show this roundness.
There's no real trick to drawing these petals other than looking at your reference image closely and trying to draw them as accurately as possible. Remember that the petals should all be attached together at the middle of the flower where the pistil is.
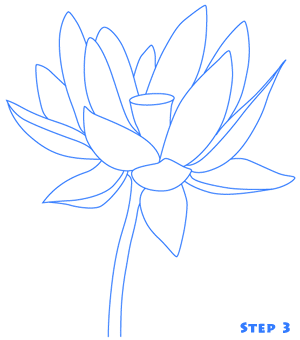 Step 3 - Back Petals and the Stem Step 3 - Back Petals and the Stem
Start off this step by drawing the petals that appear in the back of the example image. The petals are just curves that are slightly pointed at the top. Try to think which petals are in front of the other ones and draw those ones first.
Always remember to draw lightly so that if you make any mistakes you can erase them easily.
To make the stem just draw two curved lines that go down from the front petals that you drew in the second step. Once you have completed this you'll be finished with the major structure of the lotus flower drawing. In the next step you'll finish things off by adding some details to the petals and the pistil.
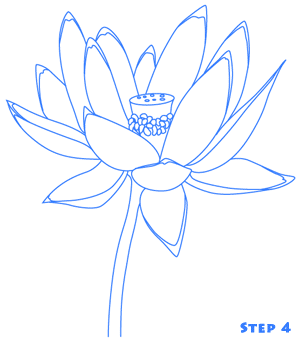
Step 4 - Final Details
Again, start with the middle of the flower and add some small circles to the top of the pistil. Next, add some bean shapes to the middle of the pistil to finish it off.
If you look at a picture of a lotus you'll see that the petals are colored differently at the tips. Follow the example image for this step to finish off your lotus flower drawing by adding lines to the tips of the petals where the color changes.
The last thing that you may want to do is add some shading to your flower. For more information on that topic you can check out the drawing shading page.
|