Follow Along and Learn
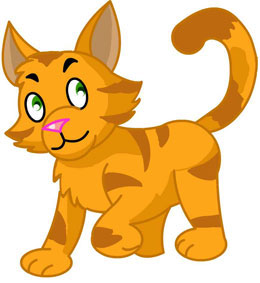
How to Draw Cats
Learn how to draw cats by starting off with a few circles so that the shape comes out easily. If you have your pencil ready, then hop right in and start drawing this adorable kitten. Remember not to make your lines too dark because you will need to erase some of the early steps once you get further on in the lesson.
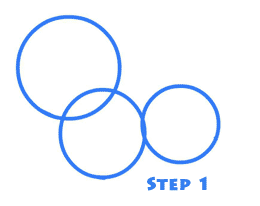
Step 1
Make one larger circle for the head and then two smaller circles for the body like in the example. Be careful that the placement is correct because these circles will let the body take shape.
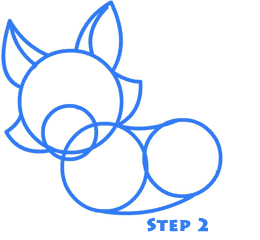
Step 2
First add another little circle lower in the larger circle to define the nose and mouth of the cat.
The next thing to draw is the ears. Add the curved lines like shown in the sketch.
Notice that both ears seem to curve towards the right as they move from the head to the tip of the ear.
It's good to think about little stylistic details in your drawings like this when you are making your own characters because it can add a little bit of personality that makes everything look better.
Next, draw some curved lines lower along the side of the face to define the furry cheeks of the cat's face.
After that join the two circles from the top to the bottom and we have the basic body shape of the cat.
 Step 3 Step 3
Start off by erasing all the extra lines in the face circles and the body so that the body shape is clear...
Add the two little ovals above the little circle in the face to make the eyes, and then add two curved lines above the eyes for the eyebrows.
To create the nose draw an upside down triangle and below that you can draw a little line going down. Once that's done the face is almost finished.
Next we come to the placement of the tail
the two curved lines going up with a little circle in the end will define the tail. If you're just learning how to draw cats it might be easier if you draw the circle at the end of the tail first before trying to draw the two curving lines leading up to it.
Then come towards the front part of the body and draw the two curved lines going down with a little circle at the end to create the paw. The other front paw is a little trickier. Follow the example and realize that although it may look complex, it is essentially 3 curved lines with a circle on the end of them to create the paw lifted up in the air.
Use the same technique of drawing two lines with a circle at the end of them to make the first back leg. The other back leg is just showing a little from behind the lifted front paw and is draw with a line and a curve.
If you've made it this far, pat yourself on the back because the whole body structure is complete now. You're almost finished just a little bit more to draw!
 Step 4 Step 4
First, start off by erasing all the extra lines as shown in the example sketch.
In this last step draw circles to fill in the eyeballs in the eyes and make the two lines curve out from the little line below the nose to get a smiling mouth for this cat.
Add some details to show stripes on the cat and add some jagged lines along the outline of the body to give the feeling of hair. That's it! You've finished learning how to draw cats!
|