Face Drawing:
An Illustrated Guide for Success
Introduction
Face drawing is something that I have come to absolutely love, I'm going to say this again - absolutely love. BUT....It wasn't until I actually began to study the face in detail that I started to love portrait drawing. It's not that hard once you know the proportions of the face, but the problem is, that in my experience, many teachers are not well versed in face drawing proportions or how to construct a head, and advise you to draw by seeing only. I'm going to demystify the head here for you and give you a system for portrait drawing that is both simple and easy to learn.
We are all so familiar with looking at other people's faces that even if someone is not a trained artist, they can spot problems with your face drawing in an instant. If you have ever drawn a portrait and looked at it for a while thinking, 'It's good, but something just isn't right, and I can't quite put my finger on what it is' - that is our own familiarity with the human face telling you that something is amiss.
When I began portraits I had the same problem, and I imagine that many other people are faced with this same problem of your face drawing looking alright, but something just doesn't seem correct. I am willing to guess that your problem lies in the proportions, or where the different parts of the face - the eyes, nose, mouth and ears are placed on your face in relation to the head and each other. Let's get right into it now and start dissecting the human head on our first lesson towards becoming a better portrait artist.
 Sharpen your pencils - Let's begin! Sharpen your pencils - Let's begin!
To start your face drawing draw a circle. It doesn't need to be a perfect circle, but the closer you can get to a perfect circle, the easier it will be to start. I suggest using a large coin, a cup, a CD or some other circular object to trace from. One thing to note here is to draw very lightly. We are creating the basic form of the head, and these beginning lines will be erased later once we have added in the final details of the head.
Why start your face drawing with a circle? Well, let me tell you - the circle is going to form the large ball part of the skull. We have a circle, but actually what we want to have is a Sphere. If you are not sure of what the difference is - a circle is a 2D shape, but a sphere, like a ball is a 3D shape. It make take a little practice to get your sphere look properly, but don't worry if things aren't looking too good at this point, I'll provide you with a guide sheet to help practice with at the end of the lesson.
 To create the form of our sphere, we need to add lines to separate the sphere into sections. If you think of the sphere as an apple, you would cut it in half to make 2 pieces. Next, you would cut each ½ of the apple twice so that you would be left with eight equal pieces. This is a front view of the sphere so you can only see 4 pieces. To create the form of our sphere, we need to add lines to separate the sphere into sections. If you think of the sphere as an apple, you would cut it in half to make 2 pieces. Next, you would cut each ½ of the apple twice so that you would be left with eight equal pieces. This is a front view of the sphere so you can only see 4 pieces.
Your face drawing is starting to take shape, but it's still nothing resembling a human face. The next step to do is to cut off the sides of your sphere. I find this step the trickiest part of the whole process, so if you can get through this, you'll be set. I've shown which sides of the circle to cut off in Step 2. We cut the sides of the sphere because the human head is not a perfect ball. Cutting these sites will give us a better shape to work with.
Still with me? Let's get into adding in some details! I will refer to the horizontal line on your sphere from now on as the brow line - or the place where the eyebrows usually sit on your face drawing. I say usually because no two faces are the same, but it is a good location as a general rule.
The Hair Line
The hair line is 2/3 up the head from the brow line when the head is viewed from the front. Just put a simple line in there for now.
The Nose and Chin
Make a line that goes down from the brow line this line should fall straight off of your sphere. It won't be visible from the front view, but when you begin your face drawing from any other angle this line will be needed.
Create 2 little lines on this line just like you did for the hair line. When viewed from the front, these lines should be separated by the same distance as is between the middle of the brow line and the hair line. The first line will be for the bottom or base of the nose, and the next line will make the chin.
The width of the nose is the same as the distance between the two eyes. I have shown this in the drawing above with dotted lines coming down from the inner corners of the eyes down to the nose.
The Eyes
The human head, in general is about 5 eyes wide when viewed from the front. If you are drawing cartoons, or babies, this rule doesn't necessarily apply but for your average adult this proportion will work extremely well for your face drawing.
Draw 4 vertical lines coming down from the brow line to divide the head into 5 sections. Do your best to keep the space between each section the same. Remember that there is one 'eye' of space between the two eyes you will create in your face drawing.
The Ears
I've left the ears out of the Step 3 drawing but the lines you need to place the ear are all there. The highest point of the ear is even with the brow line. The point where the top of the ear attaches to the head is even with the eye line. The Lowest part of the ear falls in line with the nose line. It's kind of nice how the parts of the face line up like this. Knowing this, and looking at these proportions can help you to quickly spot where your drawing may be looking a bit strange. Remember the part we sliced off the head? Well, the ear gets placed on the lower-back part of that cut off section.
The Mouth
The last thing to place on to our face. The mouth naturally falls between the base of the nose and the chin. Where to place this last important line.... 1/3 of the distance from the base of the nose to the chin. The mouth is as wide as the distance between the mid-points of both eyes. I have used a dotted line to show the width of the mouth in the Step 3 diagram above.
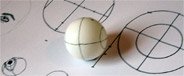 That's it for this lesson - you have now laid out the basic proportions of the adult head. I encourage you to continue on with the other lessons on drawing ears, eyes, nose and the mouth to complete your head. To move forward I would suggest taking a ping-pong ball or other kind of ball that you can draw on and try drawing the proportion lines on the ball similar to the image to the right. I can help you a lot when you are starting out trying to draw the head from different angles. Also don't forget to check out the free study guide below! That's it for this lesson - you have now laid out the basic proportions of the adult head. I encourage you to continue on with the other lessons on drawing ears, eyes, nose and the mouth to complete your head. To move forward I would suggest taking a ping-pong ball or other kind of ball that you can draw on and try drawing the proportion lines on the ball similar to the image to the right. I can help you a lot when you are starting out trying to draw the head from different angles. Also don't forget to check out the free study guide below!
 Study Guide Study Guide
As promised, here is the study guide that you can use to begin creating your own heads. Use this guide to get you started, and as soon as you begin to feel confident start using your coffee mug to begin drawing your own heads.
Click Here to view the drawing faces study sheet. I encourage you to download it and print it out so that you can draw over top of it. Happy illustrating!
|