Use Effective Eye Drawing to Create
the Window to the Soul.
Eye drawing is the next step in the process of learning how to draw portraits. After blocking in the basic proportions the eyes are usually the next part that I draw. We've all heard that the eyes are windows to the soul, and that old phrase really hits the nail on the head. The eyes are extremely important to your successful portrait drawing, and it is through the eyes that we show our many emotions - happiness, fear, anger, sadness and so on. I will be very helpful from this point forward if you are able to look at your own face while you are doing your eye drawing. I use a small pocket mirror - it does the job fine, and it doesn't take up a lot of clutter on my desk.
 Eye Construction Eye Construction
It's important to realize that the eye is actually a ball. It may sound simple enough, but I've caught myself more than a few time forgetting this basic concept so it's worth taking a moment to study. The eye is a sphere, which has a little cap cut off of it - this is where the CORNEA, IRIS, and PUPIL of the eye are located. It's not so important to remember the proper names for these parts, just know that they are all important when you are trying to make a realistic eye drawing.
A Side Note: The iris opens and closes to let more or light into your eye. When you are in a dark place, the iris opens very wide and the black middle of the eye appears quite large. When it's very bright out the iris closes to let only a small amount of light into the eye. Try it for yourself - look into your bathroom mirror and turn off the lights. Leave the lights off for 20 seconds while continuing to look into the mirror. Then turn the lights back on and watch as the iris goes from big to small.
 Fitting your Eye Drawing to the Face Fitting your Eye Drawing to the Face
Take one of the drawings that you made from the face drawing tutorial. First, we'll place in the eyebrows. Remember that they should be wider than the actual eye, so make them a little larger than the eye proportion lines that you created in the last lesson.
Look at some magazines if you are having trouble drawing the eyebrows. Remember that the head is not flat, and that when you start to draw the head from any view other than the front or side, you must account for this roundness or else things will quickly start to look bad.
 Let's keep moving onto the actual eye drawing. For this tutorial I'm going to draw the eyes as they would appear without any kind of expression. I'll leave it up to you and your mirror to experiment with different poses for the eye and eyebrows. When the face is at rest the eye should not sit very far below the eyebrow. Let's keep moving onto the actual eye drawing. For this tutorial I'm going to draw the eyes as they would appear without any kind of expression. I'll leave it up to you and your mirror to experiment with different poses for the eye and eyebrows. When the face is at rest the eye should not sit very far below the eyebrow.
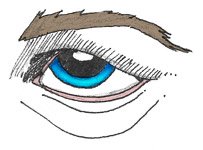
The eyelids stretch over the spherical shape of the eye, and that gives us a nice almond shape. The inner-top part of the eye slants more sharply than the outer part. At the point where the eye is closest to the nose, add in a little curve to form the tear duct - this is the little fleshy pink part of your eye. Again, look at your mirror and magazines for reference.
 The Middle of the Eye - Where the Magic Happens The Middle of the Eye - Where the Magic Happens
The colored part of the eye, or iris, pupil and cornea is usually the same height as the eye at rest. This is not to say that it actually sits directly in the middle of the eye, but the height and width of it is approximately the height of the opening between the upper and lower eyelid. Draw in the iris and the pupil.
The cornea bulges out a little from the eye, which can catch the lighting and create a highlight, or white spot on the eye. Adding in the highlight will add a lot to the believability of your eye. Look at several different magazine photos and pay attention to the shape of the highlight - it comes in all shapes and sizes and isn't limited to just the cornea covering the iris.
The Eyelids and Eye Lashes
The eyelids are important to sell the 3-dimensional shape of the eye drawing. Look at the natural crease of your eyelid over your eye, and add it above your eye. This crease can very from person to person, and certainly between different races of people.
It's also important to remember that the eyelids have a little thickness to them. Depending on how realistic you want your eye drawing and how big your eye is on the page you may or may not want to add in the eyelashes. Try experimenting with different eyelash types - drawing individual eyelashes may not give you the result you are looking for.
Practice drawing the eye from all different angles. Use your mirror to help you, and before long you will be able to draw eyes from any direction with ease.
If you're looking for more examples of eyes you can check out the cartoon eyes lesson which has examples of both male and female eyes.
One Last note
The age of your character will greatly change the appearance of the eye. You would do good to start looking at people of all ages that you see in everyday life and notice some of these differences.
|