 Drawing Hair that Looks Great the Easy Way Drawing Hair that Looks Great the Easy Way
Drawing Hair can be scary because it's a little tricky to know exactly where to start. Once you know how to draw it though, it isn't terribly hard to draw.
Step 1: Make your Outlines
Start by making light pencil lines to create the main outline of the hair. This includes the line that makes the outer shape as well as the hair that frames the face of your character.
I usually try to find a photo in a magazine or on the net that is similar to the hair that I want to draw. This helps me draw great looking hair that is based on a real person. The end result is usually better than if I try to draw only from my mind.
 Step 2: Outline the Shiny Areas Step 2: Outline the Shiny Areas
Great looking hair always has a healthy shine to it. Outline this shiny area. Depending on the style of hair that you are drawing you may have more than just one area to outline. Make the edges of your outline a little jagged. Keep your jagged lines flowing with the natural direction of the hair. If the jagged lines go against the direction of the hair you'll end up with something interesting in deed, but this tutorial isn't about bad looking hair - it's about Great looking hair! Keep that hair flowing naturally and there's nothing to worry about.
 Step 3: Filling in the Hair Step 3: Filling in the Hair
I was going on about the flow of the hair for a reason. In this last part of learning about drawing hair we're going to use the flow again as our guide. Start to draw lines that follow the direction of the hair. Keep adding more and more lines just like if you were drawing hair one strand at a time on the head. Also draw these hair lines over the shiny areas that you created in step 2. Keep adding more and more lines. What you want to do here is use your lines to create some light and dark areas of the hair by making your lines denser in some areas. Don't let your shiny areas get too dark with lines.
What you should be left with is hair that looks great and flows naturally. The Shiny areas will make the hair look healthy and natural.
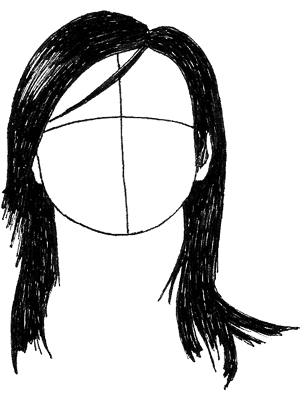
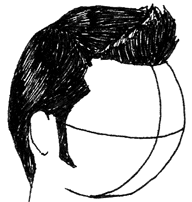
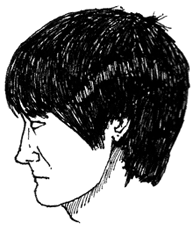
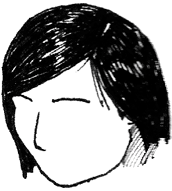 I have added some hair pictures below. Your hair should fit nicely onto the sphere method of head construction that you started off with in the first portrait drawing lesson just like the images below. I have added some hair pictures below. Your hair should fit nicely onto the sphere method of head construction that you started off with in the first portrait drawing lesson just like the images below.
Notice how I use the hair lines to define the flow and the shiny areas when I'm drawing hair. The only difference is that the lines on the non-shiny areas are a lot denser without being completely black.
|