Step by Step Dragon Drawing
in Cool TV Cartoon Style
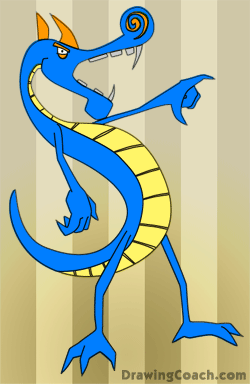
Dragon drawing, like the image to the left, is a lot easier than you might think. It looks complex, but the shapes are very basic, once you start to break them down.
If you can draw a curve and a straight line that's about all that you need to know. No joke!
A great inspiration came to make this tutorial after buying and watching several cartoon series on DVD. I wanted to show you how to make something that could fit into that kind of cool, modern style; basic, flat colors, simple shapes, and stylish design.
*Remember to draw lightly, especially in the beginning of your dragon drawing. I say this will almost every step by step drawing lesson, but it's important!
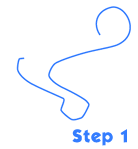
Step 1 - The Dragon Mouth and Nose
I'm not sure what you'd call this curve, but let me explain what it is. The round part at the top will make the nose. It curves down and goes into a straight line - the top of the mouth. From there we curve into the bottom of the mouth. Another curve and we're at the lip and chin. Notice that the chin is a little bigger than the bottom of the jaw - this helps to define the chin. From the chin there's another straight line with a curve at the end to finish off the jaw line.
 Step 2 - The Big "S" Step 2 - The Big "S"
To create the body of this dragon drawing we're going to use an "S" shape. Look how the line on the back of the dragon goes from the nose, curves around the back of the head, curves around the body, and then finally ends at the tail. Can you see the "S" in the design?
Now make the front of the dragon's body. It starts at the jaw and curves the same way as the back line. Use the back line as a guide.
You can see that the stomach area of the dragon a little wider, and the neck a little more narrow. This is done on purpose to style purposes and to make the dragon drawing a little more interesting.
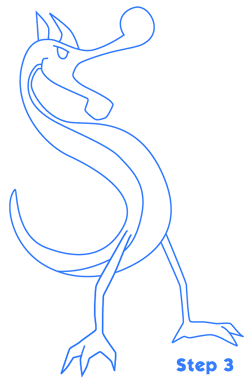
Step 3 - Legs and Some Details
Start by drawing a line similar to the second "S" curve that you made in step two. This will make the underbelly. If you look at the color image at the top of the tutorial, it is the yellow part on the dragon drawing.
Add two spikes to the top of the dragon's head. You may want to add spikes down the entire back of the dragon for a different effect.
Add a "U" shape with a line on top of it for the eye. Notice that the line at the top extends past the "U" curve a little. We'll use this later to make a thick eyebrow.
The legs are really simple - they're just lines that have a bend in them where the knee should be.
The dragon's right foot (image left) is facing toward you, and the other foot is facing to the side. If the foot is giving you some trouble - break the shape down into straight lines. Look closely and carefully and follow the example image in step three. You'll get it!
The other foot is facing to the side. This foot is a little different because you can only see two claws at the front of the foot. You can also see a claw at the back of the foot. Carefully follow the example and add the left foot.
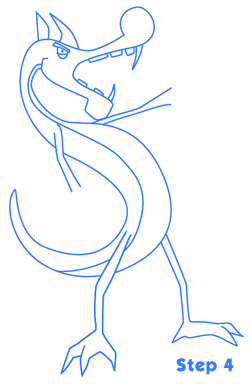 Step 4 - More details Step 4 - More details
First, let's finish the eye. Make the eyebrow thicker by taking your original line and making a rectangle out of it. It should be a little thicker toward the back of the head. Add a line that slants the opposite way to the bottom of the eye. Use a circle to draw the eyeball and finish the eye.
The lines slanting on opposite directions on the eye of the dragon drawing will make him look angry.
The teeth are simple shapes. Use rectangles and curved triangles to make the teeth.
Add the lines for the arms. To add a bit more character to the arms notice how the upper arm is a little narrower than the forearm. This is done on purpose and helps to add a little more interest to the dragon drawing.
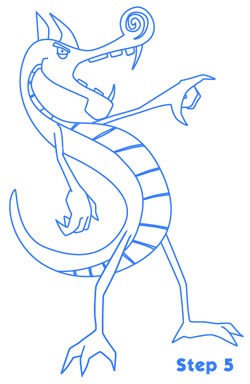
Step 5 - Last Details
Let's start with the easy parts first. Finish the underbelly of the dragon drawing with several horizontal lines. Notice how the angle of these lines changes to follow the "S" curves of the body.
Add a spiral shape to the nose. I fint that it's usually easier to start from the inside and curve out. Once you have drawn one spiral, draw another on the inside of this one to complete the shape. This funky-looking nostril will add some flair to our dragon drawing. Who couldn't use a little more flair?
Now only the hands left to finish. To draw the left hand, start with a curve that will go between the inside of the thumb and the pointer, or second, finger. From this curve you can connect the pointer and the thumb to the arm that you drew in step four. Finish off this hand by adding two more fingers inside of the curve.
The dragon's right hand is drawn similar to some of the other cartoon characters like the cartoon monkey tutorial. When drawing a hand like this, the best way to start is by drawing the curved finger on the outside of the hand. The other fingers will tuck in behind this one and use its curve as the guide for their shape, so once you have the first one drawn the others should follow its example.
After the first finger is drawn, connect it with a curve to the arm line that you drew in step four. Now draw one finger poking out from behind this curve.
Next draw the two other fingers that are behind our first finger. The pointer finger should connect with a curve to the other arm line from step four.
Draw the thumb of your dragon drawing poking out from behind the line from the arm to the pointer finger. That's it, you're finally finished!
|