Drawing a Fun Cartoon Mouse
in Just Four Simple Steps
So Disney may have set the precedent for what a cartoon mouse that talks and walks upright is supposed to look like, but it can be a lot more fun creating one of your own. To make it an even more attractive idea, you can do it in four simple steps. Are you ready? Grab your pencil and paper, and let's go!
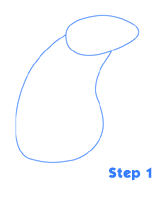
Step 1 - The Head and Body
The base of any cartoon drawing is always the head and body, and we'll start our mouse drawing the same way. The head will be an egg shape lying on its side with the pointier end facing right. The body is like the shape of a bean, with the top hidden behind the egg. Simple, right? Let's go ahead and move on.
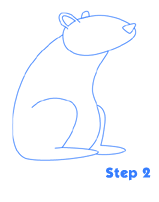 Step 2 - Ears, Nose, and Haunches Step 2 - Ears, Nose, and Haunches
The ears and nose are the most important features to a mouse because they use ears to detect danger and their noses to smell food. Our cartoon mouse will get these next. A nose is simply a rounded off triangle just left of the end of the snout. The ear on the side away from us will just be a bump, while the one facing us will be a large rainbow-shaped arc, with another smaller one inside.
Our little mouse is sitting down, so we'll draw haunches for back legs. The one facing us is just another rainbow, facing at a 45 degree angle. The foot on this will extend just beyond the body and be a thin, rounded "V" shape that meets the arc of your haunch. On the side facing away, you'll simply curve a line starting just above the stomach and bring it straight down to another foot at the same level as the first. The rest of the leg is hidden from view.
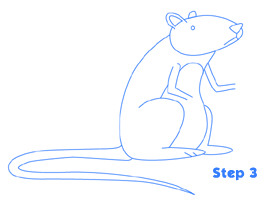 Step 3 - Arms and a Tail Step 3 - Arms and a Tail
The front legs on our cartoon mouse will look like arms, with a basic "V" shaped bend at the elbows. To create these in the right spot, you might first want to draw the "belly" of the mouse, which is usually a different color than the rest of the fur. This will simply curve around from the top of the visible back leg to a point where it disappears around the other side, just below the neck. Now, the arms will begin just above that curved line on either side.
When your mouse smells food, he has to see to find it, so add a tiny circle close to the visible ear for an eye. Now, he has to be able to eat it, so from the bottom tip of the nose, draw a short straight line down, then connect an upside down "V" for the mouth.
You can add two slash marks to the front foot for toes.
Now, you can get creative with the tail. Of course, the cartoon mouse is sitting up and needs balance, so the tail should be on the ground behind him. However, you can choose your shape - an S curve or, like mine, a simple "U" shape. Make sure the tail is thicker at the starting point and comes to a point at the end.
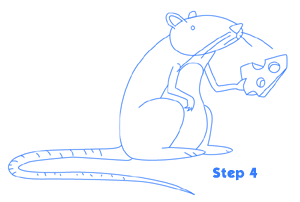 Step 4 - The Plate and a Sesame Bun Step 4 - The Plate and a Sesame Bun
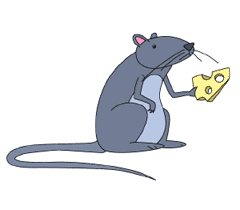
Add whiskers to your cartoon mouse with long, sweeping, shallow arcs, and give him a right hand with a quick upside down "W". Add spots to the tail - these will be the little bumps of the tail - and give the mouse a treat. In his left hand, draw a bit of cheese for good behavior. Start with a triangle, adding circles in the middle and three-dimensional sides. Now, your cartoon mouse can be colored and actually seems like a cuddly pet!
|


|