Ever Wanted to Learn
How to Draw Cartoon Dogs?

 This cartoon dogs drawing lesson is a little different than some of the other tutorials you may have done on this site because instead of starting off with simple shapes were going to start off by drawing forms. This cartoon dogs drawing lesson is a little different than some of the other tutorials you may have done on this site because instead of starting off with simple shapes were going to start off by drawing forms.
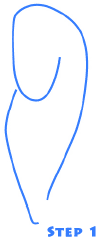
Step 1 - The Head and Body Forms
There are two lines in this step. The curved line at the top that looks a little bit like an unfolded paperclip is the head and the outline of the back. The other line is the chest and midsection.
Take a quick look at the finished drawing and see how the curve of the head will actually make the smile of the dog. As the line curves towards the back of the head it straightens out. It might look a little strange right now but we'll add the nose (muzzle) in the next step and the face should start to come together.
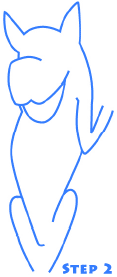 Step 2 - Legs, Arm, Ears and the Muzzle Step 2 - Legs, Arm, Ears and the Muzzle
We'll start at the bottom and work our way up. Draw a curve on each side of the body at the bottom to make the two hind legs.
Add two lines for the arm about two thirds of the way up the line that connects to the head. The character will be waving to make sure to add a bend in the elbow.
Draw two ears on the head just as they appear in the example image. There are many different styles of cartoon dogs that you could draw and the ears are one part that you can experiment with to get many different species of dogs.
From the curve that we drew in the first step draw a stretched out and flattened "W" shape to make the top of the mouth. Keep extending the line a little bit further and let a curve up backing towards the head to make the nose area.
This step is a little bit tricky to explain, so please look closely at the example image and try to draw as closely to the example as possible.
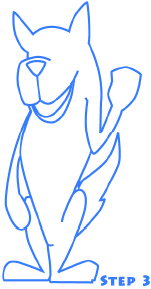 Step 3 - Things are Starting to Take Shape Step 3 - Things are Starting to Take Shape
Once again we'll start at the bottom and work our way up by drawing the feet first.
TIP - Usually when I draw feet I will start at the ankle, draw the top of the foot, and then connect the heel to the toes with a straight line.
Draw the tail with simple curves behind the left leg. Just like the ears you can change the dog species by experimenting with different styles of tails.
Use simple curved lines to draw in the waving hand and the other hand that is resting along his side.
To make the nose first draw a line up from the middle point of the upper lip "W" shape you made in the last step and then draw an upside down and slightly rounded triangle at the end of this line. Finish off the mouth by adding a second line around the bottom of the mouth to create the bottom lip.
 Step 4 - Finishing Up Step 4 - Finishing Up
This time we're going to work from the top down to the bottom. Fill in the inside of the ears and then draw two circles for eyes. Add upward slanting eyebrows on top for eyes to make the dog look friendly.
Cartoon dogs need paws so add three small circles and a larger rounded square to the hand that's waving to make it really look like a paw. Add some small lines to the other hand and to both feet to show that the paw isn't just one solid object - that it has toes or fingers.
The last thing to draw is the chest. Make this by drawing a curve that goes from the side of the mouth down towards the midsection on both sides of the body and you're finished!
I hope you enjoyed learning how to draw cartoon dogs.
|