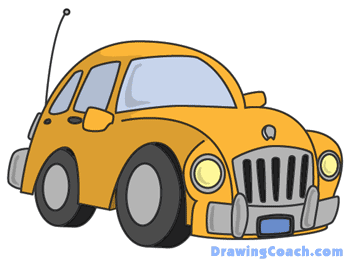
How to Draw Great Cartoon Cars
Though the image may look simple, there's actually a lot more going on in the drawing than you may realize. This guide will help you with some of the problems involved with drawing cars and help you make something that looks really great. Let's get right into drawing cartoon cars before you start getting bored!
Note that the large curve and the smaller curve are connected. Cartoon cars come in all different shapes, use this guide to start, and then try experimenting with different shapes of your own!
TIP: Remember to let your curves flow. If this seems unnatural to you, try some practice curves on a piece of scrap paper. You'll get it eventually! When drawing cartoon cars it's important that the quality of your curves is good or your end result won't look nearly as nice as it could. Connect the two lines that you just made outside of the headlights. This line should have a slight curve in it. Remember when drawing cartoon cars or anything for that matter, to draw lightly with your pencil so when it comes time to clean up your drawing you can erase any ugly unwanted lines easily. Add one last line from the back corner of your first big curve and attach it to the front of the car. Don't worry about the wheels just yet; we'll tackle those at the end as they are the hardest part to get looking right.
Notice how the two windows on the side are slightly different sizes. This is due to perspective and will help make your cartoon cars look more believable.
Start with the easiest parts first - the rear-view mirrors. The shapes are simple enough; add them on to both sides of the car just in front of the front-side windows. Next draw two rectangular, yet curvy, shapes to form the details on the front bumper. Draw a curved rectangle behind these curves to finish off the front bumper. Let it extend past the edge of the car on the left side. This will cover up the difference between the lines on the outside of the headlights that we created in step two. Next, draw the wheel wells. This can be a little bit tricky. Because of perspective, like the windows, the front wheel should be larger than the back. Draw lightly and keep trying until you get two curves for the wheels that look pleasing to you.
Add a curve to the back of the car with a little circle on top to make the aerial for the car. Draw two rounded rectangles to the back of the car to create the tail light and the back bumper. The door handles are simple oval shapes. Draw them just below the windows and remember that because of perspective the back door handle should be smaller than the front one. Two rounded rectangles, one inside of the other will form the license plate. Just above that draw the grill of the car. To make the basic shapes for this draw two straight lines coming up from the details on the front bumper. Then draw a curve at the top of these lines that connects them together. We'll use rounded rectangles again to create the spaces in the grill. The last thing to add is the wheels. Draw a large oval inside of the wheel well. Then draw another smaller oval inside of it. This second oval should be a little closer to the back of the wheel than the front. Look closely at the front wheel in step five for a clear example of this. Again, perspective causes this to happen. To give the wheel some thickness First draw a small straight line that extends from the lowest part of the larger oval you just drew. Next, draw a curve that matches the curve of that oval starting from the end of the straight line that you just made. This curve should connect with the body of the car. Add a hood ornament for the final detail. You can copy the one in the image or create your own to add your personal touch to this cartoon car. That's it for this step by step lesson on how to draw great looking cartoon cars. There are a lot of little details that all come together to make the car look great. If you find that you car didn't come out looking too hot, go back to the start and try drawing it again. I'm sure that you'll find that your second car looks much better than your first attempt. Don't get discouraged, keep at it, and it will all come together! Don't Miss This - Learn to Draw from Professional ArtistsAre you looking to make a breakthrough with your artistic abilities? Artists from the world's top studios like Disney, Nickelodeon, Blue Sky, and Pixar are sharing their hard-earned knowledge so you can learn directly from the people who create the amazing comics, movies and cartoons that we all watch and love. If you're tired of looking for a good teacher - stop looking right now and click this link. |
|
 Drawing cartoon cars that look good is not as easy as it may seem because we are very familiar with the shape of a car.
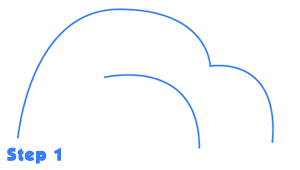 Step 1 - Car Curves
 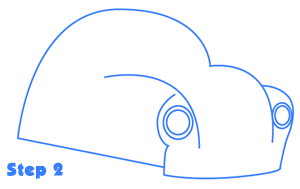 Step 2 - Headlights and Body
  Step 3 - Windows
 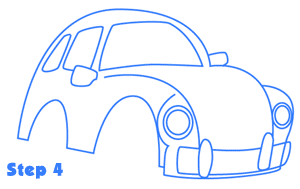 Step 4 - The Big One!
 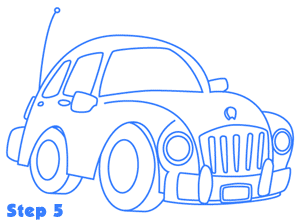 Step 5 - Final Detailing