Illustrating the Cartoon Bee,
Lazy-Eyed Larry
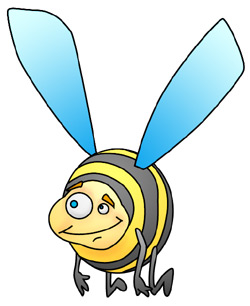
Drawing a cartoon bee with personality is what you'll learn in this lesson. If you've never understood how to take basic shapes and turn them into a unique drawing, this lesson can help you learn the concept quickly. Let's take a look at four easy steps to building one of my personal favorites - Lazy-Eye Larry.
Step 1 - The Base
All cartoon drawings can start with a couple of basic shapes, and these are usually used to start the head and body. Larry, our cartoon bee, begins with one small circle inside a larger circle or oval (it's not a perfect circle, but we are going to make modifications anyway, so either one will work).
Step 2 - Modifications
Okay, so when Larry the Cartoon Bee is finished, his head isn't just a circle. In fact, he's got a bit of blubber on him that makes him cheeky, so we'll take the inner circle and bubble it out to both sides with a "C" shape that will give him fatty cheeks.
From there, we can't just leave the body as is because Larry has stripes, as any cartoon bee should. So, starting from the outside of the oval or circle and working your way in, you'll follow the basic curve of the oval around and create stripes for Larry. They don't have to be perfectly even (and in fact shouldn't be), and it's okay if the lines are a bit wobbly. Remember, Lazy-Eye Larry is a cartoon bee with a bit of a vision problem, and he doesn't realize his stripes are beginning to sag and wrinkle.
 Step 3 - The Face and Limbs
Okay, so now that this little bee has a head on which to place features and a body to support limbs, let's get this show on the road. Start with Larry's lazy eye. This one will be on the left hand side of your drawing (Larry's right eye). Draw a really big circle, with a smaller circle inside close to the upper left hand part of the large circle.
Now, just to the right of that eye, you are going to draw another eye that is just slightly bigger than the pupil of the first. The pupil inside this circle will be in the same position as the first but will be little more than a dot.
Eyebrows are uneven triangles placed crookedly above each eye. The mouth should be a lazy grin with laugh lines at either side. Use a slash mark to give Larry a double chin.
The limbs are going to be skinny and seem to just "hang" from the body. Back legs are an "L" shape at an angle a little more than the typical 90 degrees, and the front left leg (on the right) will have a slight bend, while the opposite will just be two short, straight lines.
Step 4 - Wings, Fingers and Feet
Lazy-Eye Larry the Cartoon Bee is almost done. To practice the wings, start with a couple of simple triangles drawn at odd angles, and play around with smoothing out the angles, rounding the lines into shallow arcs, and placing bumps here and there. Back feet are just a couple of ovals, with overlap lines erased. In the front, we'll create hands with upside down "W" shapes for fingers and connecting lines to the arms. Now, you're done. As you can see, using basic shapes to create a base for a more caricature style drawing is easy!
|