Cartoon Buddha Drawing Lesson
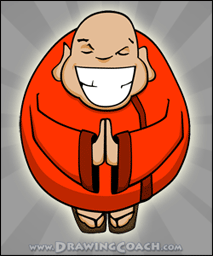
 The cartoon Buddha drawing in this how to draw lesson is both easy and fun. Grab your pencil and eraser and let's get busy! Remember to draw lightly so you can erase any mistakes that you make along the way. Once you finish everything up and you can trace over your lines again with either a pen, or pressing hard with the pencil to get nice clean lines in your final drawing. The cartoon Buddha drawing in this how to draw lesson is both easy and fun. Grab your pencil and eraser and let's get busy! Remember to draw lightly so you can erase any mistakes that you make along the way. Once you finish everything up and you can trace over your lines again with either a pen, or pressing hard with the pencil to get nice clean lines in your final drawing.
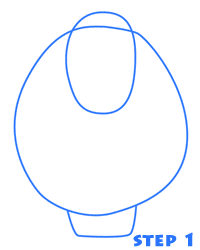
Start your cartoon Buddha with two ovals, one for the body and one for the head. Drawing the body's circle first may be a little bit easier than trying to draw the head first. There is a proportion in the way that the two circles relate to each other. The head circle is about half the height of the body and about a third of the width.
On the bottom of the body circle put a rectangular shape which we will later turn into 2 feet.
TIP - When you're making any kind of drawing, always be sure to compare the size of objects to each other so you can come up with simple relationships using halves, thirds or fourths to make things easier to draw in proportion to each other.
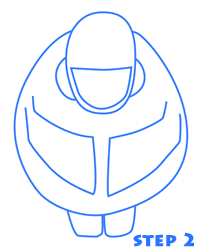 Step 2 - Mouth, Cheeks, Arms and Feet Step 2 - Mouth, Cheeks, Arms and Feet
First add in the cheeks by drawing to half circles on each side of the head. Next add a big smiling mouth. Start this off by drawing a slightly curved line along the top of the mouth. Then make a U-shape that closely follows the circle that you drew for the head to finish the bottom of the mouth. Notice that the top line of the mouth is a little lower than where the top of the cheeks connect with the head.
Next we'll add arms to this cartoon Buddha drawing. Start by drawing the line along the top of the arm. Because this is a cartoon, we've exaggerated some of the proportions and the upper arm is very short compared to the lower arm. Once you're finished with the line for the top of the arm, draw a vertical line where the end of the sleeve will be. Finish up by drawing the bottom line of the arm and then do the exact same process for the arm on the other side of the body. Usually it's easier to start from the armpit and move down towards the elbow and eventually where the hand will be.
Finish off the step by adjusting the little rectangle you drew at the bottom of the body and making them into 2 square feet.
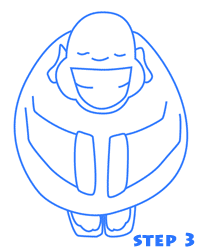 Step 3 - Adding Details Step 3 - Adding Details
Start off by drawing the eyes and nose on your Buddha Drawing. You can draw these in any order you wish but usually I draw the eyes first. All of these details are just simple, short curved lines. Use more curved lines to draw ears along the side of the head. One of the characteristics of the Buddha is that he should have very large ears. Add some more curved lines along the sides of the mouth to give a little indication of the teeth.
TIP - Usually your drawing will look better if you just hint at drawing the teeth instead of drawing each individual tooth.
Add some curves to show the feet. Just like the teeth, we're not really defining each individual toe. What we want is more like generalized shapes. This both looks good, and is also easier to draw.
Finish off the step by starting to indicate the end of the sleeves with rounded rectangles for each arm.
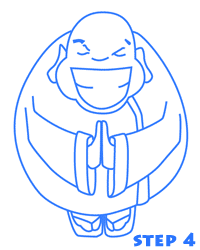 Step 4 - Finishing Up the Cartoon Buddha Drawing Step 4 - Finishing Up the Cartoon Buddha Drawing
Start by adding eyebrows and a little line above each eye to give a little more personality this cartoon Buddha drawing.
Next add two curved lines going from the bottom of the head down under the arm and finally ending at the bottom of the body. These lines will help to define the Buddha's clothing.
The hands might look a little bit tricky but they're not that bad. First, add a curved line inside of the rounded rectangle you drew in the previous step. This will help create the hole in the sleeve where the hands come out. It's a little hard to explain but if you compare this area the previous step it should be clear how to create this part. Next, draw in two hands that meet in the middle. There is no real trick to drawing this; just follow along and copy what you see in the image to the right.
Add what looks like a "Y" to the feet to show the straps on the sandals that hold the feet in place. Now that you're done drawing, color in your Buddha and you are all finished.
|

 The cartoon Buddha drawing in this how to draw lesson is both easy and fun. Grab your pencil and eraser and let's get busy! Remember to draw lightly so you can erase any mistakes that you make along the way. Once you finish everything up and you can trace over your lines again with either a pen, or pressing hard with the pencil to get nice clean lines in your final drawing.
 Step 2 - Mouth, Cheeks, Arms and Feet
 Step 3 - Adding Details
 Step 4 - Finishing Up the Cartoon Buddha Drawing