2 Point Perspective Drawing TutorialIn this 2 point perspective drawing lesson you'll learn how to draw buildings and objects at an angle. It's almost the same as the one point perspective but instead of just one point along the horizon you'll have two points. This will allow you to draw perspective objects at an angle - not just straight on like one point perspective. Where the first tutorial just scraped the surface of perspective, mastering 2 point perspective drawing will give you the info you need for drawing more interesting things. Build a Simple Construction Grid 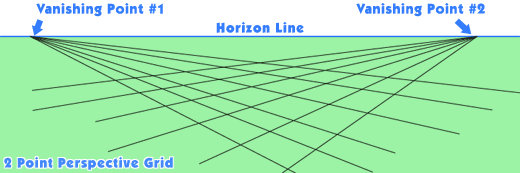 You can use the image above as a guide. Lines come from your vanishing points and meet in the middle. You can see that when these lines meet they form a checkerboard pattern. Notice how the squares near the bottom of the image appear larger than those towards the back. This is your 2 point perspective drawing in action. Objects closer to the person viewing the image will appear larger, and those farther away will be smaller. It is not always necessary to make a perspective grid like the image above. I would advise making one, especially if you are new to 2 point perspective drawing. This grid will give you a starting point that you can work from. Drawing in 2 point perspective step by step  Next, draw lines from the top and bottom of the you drew in step one line back towards your two vanishing points. These lines will make the sides of the box. You should notice that these lines will naturally make triangles. If you can imagine this box as being so large that it went all the way back to the horizon that it would appear to get smaller and smaller as it gets closer to the horizon. 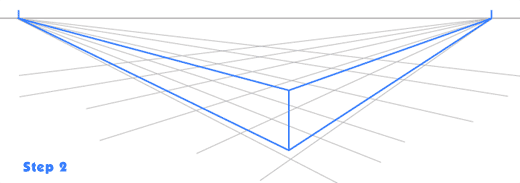 Now draw 2 more vertical lines between each of the triangle shapes. These lines will define the length and width of the box. 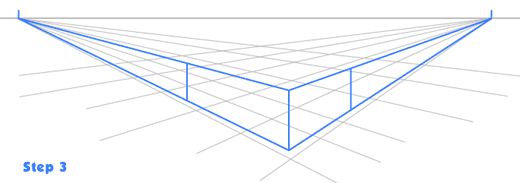 From the top of the lines that you added in step two draw another set of lines that go back to the vanishing points. You should note that these lines will cross. The point where they cross is the back corner of the top of your box. In the last step we'll clean up the construction lines and finish off the 2 point perspective drawing. 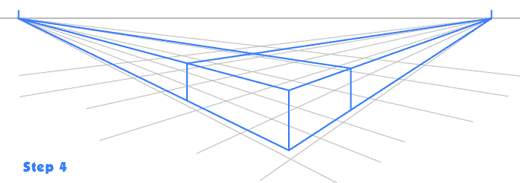 Remove any lines that are not necessary to define the box. I colored in my perspective box to make it more clear. 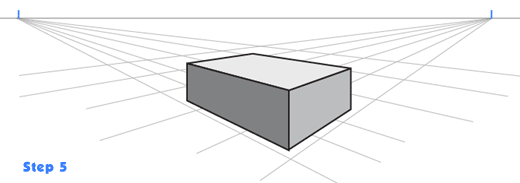 Don't Miss This - Learn to Draw from Professional ArtistsAre you looking to make a breakthrough with your artistic abilities? Artists from the world's top studios like Disney, Nickelodeon, Blue Sky, and Pixar are sharing their hard-earned knowledge so you can learn directly from the people who create the amazing comics, movies and cartoons that we all watch and love. If you're tired of looking for a good teacher - stop looking right now and click this link. That's it for this 2 point perspective drawing lesson. Go back to the perspective drawing lessons page and continue with your technical drawing education.
Click here to return from 2 Point Perspective Drawing to How to Draw
|

|