1 Point Perspective Drawing -
Lesson 2 - How to Draw a Circle
In 1 point perspective drawing lesson one, construction of a cube was the first step that you took. What you will learn in this lesson is how to draw a circle in perspective. This will come in handy if you ever want to draw car tires, fountains, cylindrical buildings or anything else that uses the circle as its base shape.
Step by step drawing of a circle in 1 point perspective.
Start off by drawing a rectangle or square in perspective just like you learned in the first perspective drawing lesson. Establish your horizon line first, and then add your vanishing point.
Step 2 - Start to define your box
Next draw a vertical line somewhere on the page - for the purposes of this tutorial it will work best if the vertical line you draw and your vanishing point are not too close. Now, draw lines from the top and bottom of this vertical line back towards your vanishing point.
Finish off by drawing one more vertical inbetween the two lines that you just drew. The next thing you'll do is learn how to great a helper grid in 1 point perspective. Perspective grids are extremely helpful when you want to draw any kind of curved or irregular shape in perspective.
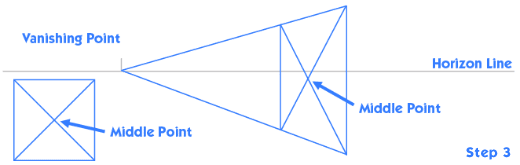
Step 3 - Find the mid point of your shape
In 1 point perspective drawing it's really important that you know how to find the mid point. Draw a diagonal line from each corner to make an "X" inside your box. Where the lines meet will always be the middle point of the shape.
From this point onward in the tutorial you will see a second square on the left side of the image that shows how your drawing would look if it were not in perspective. Use this image to help you understand what is happening in your 1 point perspective drawing, as the images are identical in construction - the only difference being is that one has perspective applied to it to add depth, and the other doesn't.
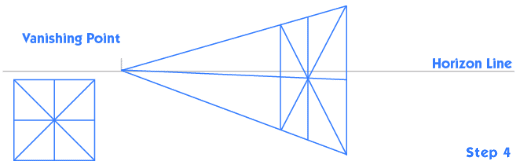
Step 4 - Divide your box into four parts
Now that you've found the mid point of your box draw a vertical line that passes through the mid point. Next, draw a line that passes horizontally through your midpoint and goes back to the vanishing point on the 1 point perspective horizon line.
What you will be left with is a box that has been divided into 4 equal parts.
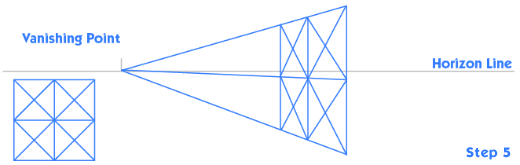
Step 5 - Find the mid-point again
Use the same diagonal line technique to find your mid points of the four smaller boxes. You may be asking yourself what you're doing right now - this was supposed to be a circle drawing tutorial right? I hear you! The reason that it's important to first construct a 1 point perspective grid is that you will use it later as a guide for drawing your circle. The grid will set you up to get the best result possible, especially if you are new to drawing in perspective.
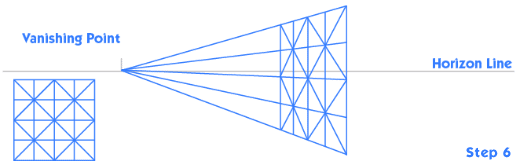
Step 6 - Add in additional horizontal and vertical lines
Repeat what you did in step 4 by adding in the lines that will leave you with 16 little boxes. In the next step you will draw the circle.
Step 7 - Draw a circle in perspective
Here's where all of your hard work in constructing a 1 point perspective grid is going to pay off. Look at the square in the bottom left of the step 7 image. You can see the construction grid that you created and it now has a circle drawn on top of it. You can also see the circle drawn in perspective.
Pay careful attention to look at where the circle is passing through the guide lines in your perspective grid on the left. Your ability to match what you see in the two images will determine how well your circle looks.
Look closely at the top left area of the circle on the left. Take note of the exact points where the lines of the circle cross the lines of that perspective grid. Once you have a clear idea of where your circle should cross which lines, go to your perspective grid, and before you draw anything, put a small point on each of the lines that the circle crosses over exactly at the point where the circle meets the line. I'll say thing again because it's very important. How accurately you are able to match what you see in the drawing on the left to the drawing on the right will determine the success of your drawing.
Remember too that if it doesn't look good the first time, try it again and again until it does look good. The first time I tried this technique I didn't have a lot of success, but after repeating the process a few times I was able to draw a circle without a problem.
If you are having a lot of problems you could find the midpoint one more time and create an even smaller and more exact grid. This may be a good idea in the beginning. Drawing more grid lines requires a little extra time, but if that's what it takes for you to master the concept don't sell yourself short. Put in the work today and by tomorrow drawing circles should feel completely natural.
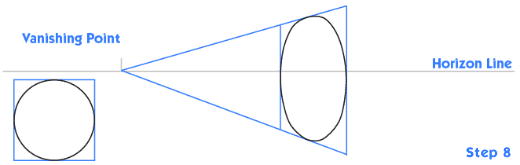
Step 8 - Cleaning up
Erase the lines that you made to create your perspective grid. And you're left with a great looking circle that's drawn in one point perspective.
|